None
Barcodes can be created on your local computer using Microsoft Word or Excel. This is typically required when testing the software or doing a demo for a customer.
This is different from setting up Barcodes for Crystal reporting. For more information on Barcode Fonts for Crystal reports, refer to Barcode Fonts.
If you don’t like reading, you can watch the video.
Try it!
Download the barcode font.
The first step in the process is to download the font. We typically use Code3of9.tff. These fonts can be downloaded from several places on the Internet.
Barcode Fonts for Windows -
Install the font
Follow the normal Microsoft instructions to install the font for Office.
Take note of the following notes when installing fonts:
You may need to quit and restart Excel or Word for the font to appear in your font list.
You should have downloaded the font.
Find the font file that you downloaded, keeping in mind that it may be contained within a .zip file. It’s probably located in your downloads folder.
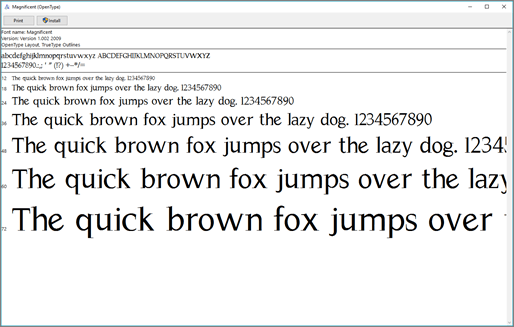
Double-click the font file to open it in the Font Previewer
If you're satisfied that this is the font you want, click Install at the top left.
Close the Font Previewer, and open your Office program. You should now see your new font included on the font list.
Create a Barcode in Excel
Create two columns in a blank spreadsheet
Place the alphanumeric data in the Text column (this is the basis for the barcode). The barcodes will appear in the Barcode column.
If you want to add a description of each item the barcode applies to, add additional columns to make a table-like layout.
Format the cells in the Text column.
Select the Text column, then right-click on it. Select Format Cells, select Number, and select Text. This will prevent larger numbers from displaying in scientific notations as well as preserve leading zeros.
Enter the following formula: =“*”&A1&”*” in the blank row of the Barcode column.
The Code 39 font can encode 1-9, A-Z (the font considers uppercase and lowercase the same), hyphen (-), dollar sign ($), percent sign (%) period (.), slash (/), plus (+), and a space. The font also encodes the asterisk (*), which is used as an indicator for the beginning and end of the sequence (this is also why the formula in Step Three adds an asterisk before and after the text is entered). The Barcode column will automatically populate with barcodes.
We’re assuming that the cell in the Text column is A2; if not, adjust the formula accordingly. If there’s no text in the first column, the second column will display two asterisks.
Next, change the font in the Barcode column. From the font menu, select the downloaded and installed barcode font.
Then start entering alphanumeric data into the Text column.
Drag the formula entered in the Barcode column down. This will depend on how many Barcodes you want to create.
The Barcodes can then be printed on labels and placed on the stock that must be scanned.
Import the Barcodes into DATASCOPE WMS
To import these Barcodes into DATASCOPE WMS, refer to <what>


